

We may receive a commission from our partners if you click on a link to review or purchase a product or service. Click to Learn More
QuickBooks Online is a great accounting platform for handling complex tasks and customizing workflows, and performed well in our research and testing. There’s a reason it’s the best accounting software for small businesses.
One downside to all that complexity, however? It can be tough to get started with QuickBooks.
This guide takes a look at the basic steps you’ll need to take when first setting up your business on QuickBooks Online, as well as common processes you’re likely to deal with, from reconciling or deleting deposits to using the mobile app.
Our team of experts has gotten hands-on to explore how QuickBooks Online functions, from the most useful features to the quality of phone support you might need. Read on to understand the key QuickBooks tools. Just don’t forget to select Alt + S whenever you need to save your form!
https://www.youtube.com/watch?v=AoIuRvZWLcU&ab_channel=IntuitQuickBooks
How to Use QuickBooks Online
Getting started with this popular accounting software doesn’t have to be overwhelming. Here’s our checklist for any newcomers:
- Figure out your dashboard
- Input company details
- Set up sales settings
- Import business data
- Connect your bank cards
- Connect your payroll software
- Add integrations
- Figure out your tax needs
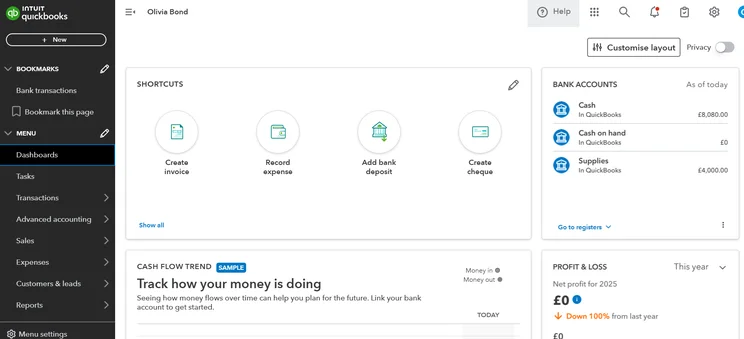
QuickBooks Online’s main dashboard includes shortcuts for easy access to common tools. Source: Tech.co testing
1. Figure out your dashboard
If you want to know how to use QuickBooks Online, your dashboard is the central hub that you’ll rely on for the software. When you first open it, a “setup checklist” will prompt you to customize your experience by adding basic business information and the categories of expenses you’ll typically be dealing with.
A checklist of “favorites” can also be set up: Just click the “three dots” under the favorites widget on the right-hand side of the dashboard, and select your top five most-needed tools from the list.
2. Input your company details into QuickBooks
Open the Settings gear icon on the top right-hand side of your dashboard and select “Account and Settings” from the dropdown, followed by “Company.” This takes you to your company details page, which you can edit to add your company name, as well as your logo, contact info, and physical address (both legal and customer-facing).
3. Set up QuickBooks’ sales settings
The main sidebar menu includes the “Sales” and “Expenses” tabs, and beginners will need to add data to both of these pages in order to allow the QuickBooks software to correctly generate reports.
Key information to add here includes sales form design and content, invoice automation setup and tax details, as well as the year-end date that company reports will use. Many features can be toggled on or off, allowing you to choose what expenses or sales elements should be used, from purchase orders to tracking items by customer.
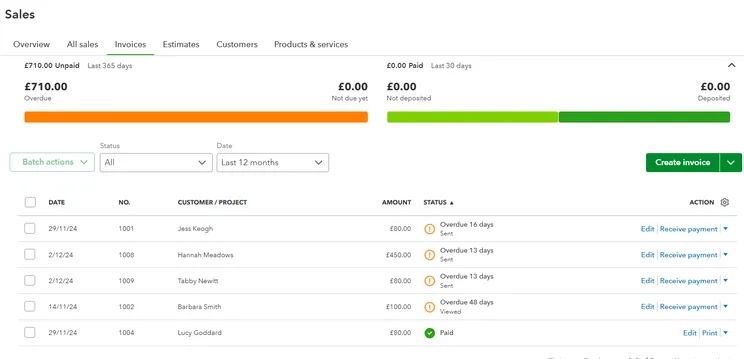
Invoice records can be accessed under the Sales section of QuickBooks Online. Source: Tech.co testing
4. Import business data
You can import your existing data spreadsheets into QuickBooks by going to the Settings gear icon and selecting “Import Data.” You can upload files listing customers, suppliers, products and services, invoices, sales receipts, bills, credit notes, and charts of accounts. QuickBooks accepts common file types, including MS Excel and CSV files.
The wealth of data QuickBooks can process makes it a great fit for business models too unique for generic software, such as hospitality industry accounting software.
5. Connect your bank cards
Accounting software is all about connection, and getting credit cards, debit cards, and bank details added is essential.
To start adding your bank details, visit the “Transactions” tab from the main sidebar menu on the left-hand side of the dashboard. Then, select “Bank transactions,” followed by “Connect account.” This will bring up a search bar that lets you find your existing bank. Sign in, and follow the on-screen steps to connect the accounts you need.
6. Connect your payroll software to QuickBooks
QuickBooks Accounting supports integrations with other payroll services, but it offers its own software as well. We recommend QuickBooks Payroll, and it will appear as the “Payroll” tab on your main dashboard menu if you use it.
We can also offer deals on the best payroll software solutions on the market. Whichever service you use, you’ll want it integrated with your accounting software to automate your tax process.
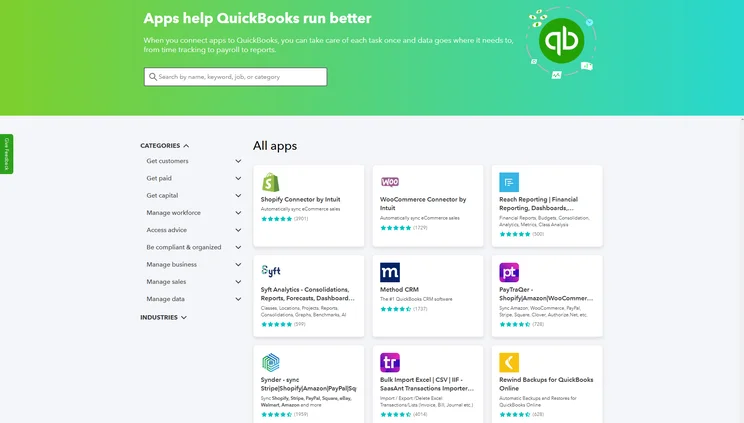
QuickBooks Online offers a library of integrations, so users can connect with useful third-party tools. Source: Tech.co testing
7. Add integrations
You’ll also want to add integrations with any other business software service you already use. QuickBooks offers a range of integrations covering areas including sales, compliance, marketing, and cash flow forecasting. Visit the QuickBooks App store to find what you need.
8. Figure out your tax needs
Tax season arrives for everyone, and your business should be prepared ahead of time. Find out which tax deadlines are relevant, depending on the federal, state, and local regulations that may apply to your operation. If you’re using QuickBooks Payroll, it has the tax reporting functionality needed to walk you through this process, although you’ll still need your federal and state ID numbers.
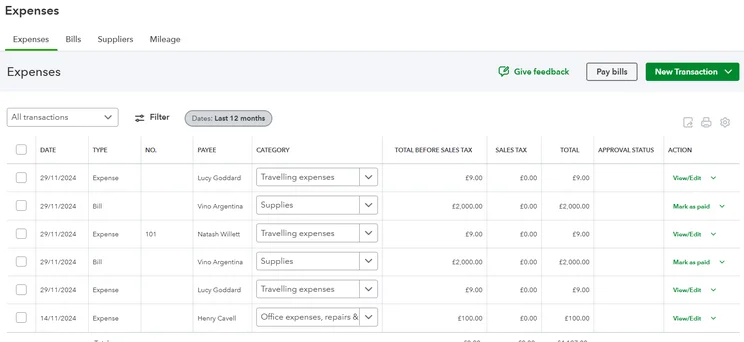
Expenses are another core section that new QuickBooks users should update. Source: Tech.co testing
How to Reconcile in QuickBooks Online
“Reconciling” refers to the important accounting process of making sure the financial activity on your bank and credit card statements matches up with the records in your accounting software. You’ll want to look for and fix any differences between the two every single month.
Here’s how to do it with QuickBooks software:
- Review or enter the opening balance: Select “Settings” and locate the “Reconcile” tab under the Tools section. Alternatively, you can access the “Reconcile” tab under the “Transactions” section in the left-hand sidebar menu on the dashboard.
- Select the account you need to reconcile: You’ll see a dropdown menu that you can pick the right account from, as well as the fields you’ll need to enter the ending balance and ending date from your bank statement.
- Fix discrepancies with the opening balance if needed: Your opening balance might be fine. But if there’s an issue, you’ll need to visit your discrepancy report and manually edit it. QuickBooks will link you to this report.
- Check audit history: Some discrepancies are caused by multiple changes, rather than just one. To address this, click “View” under the history section to see the Audit History for the transaction in question. This lets you see all the changes at once.
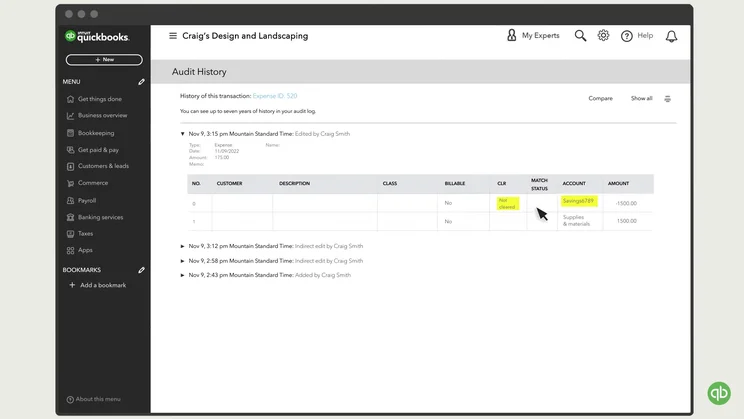
The “Audit History” section includes fields for the customer, amount, and further description. Source: QuickBooks
How to undo reconciliation in QuickBooks Online
If a reconciliation has too many discrepancies, reversing that reconciliation might be the best move. If you just need to start fresh from a previous reconciliation, you can get your accountant to reverse the current one.
You’ll need a plan that allows multiple users to add your accountant. Here’s the process for adding an accountant from your settings menu:
Settings > Manage Users > Accounting firms > Invite
Your accountant can then navigate to the main “Reconcile” page and select the “History by account” button on the upper-right corner. This allows them to undo the previous transaction without needing to manually edit individual transactions from within the register.
You can also manually edit each transaction:
- Navigate to Accounting > Your Company > Chart of Accounts
- Choose your account and select View Register
- Click the “R” status until it is blank or says “C” for cleared
- Click “Save” and select “Yes” when prompted to confirm
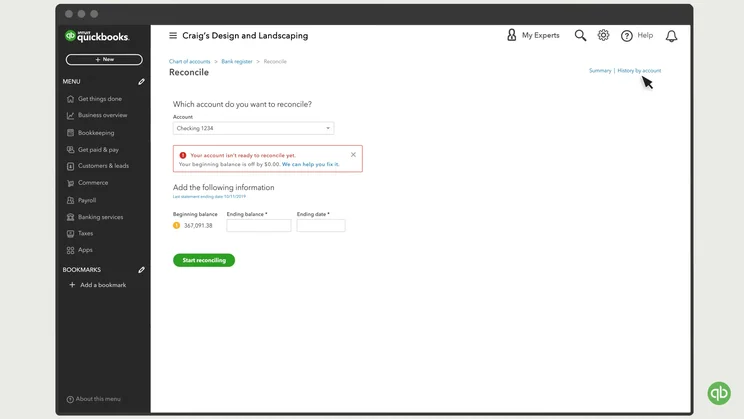
The “History by account” button is visible on the upper right-hand corner of the “Reconcile” page. Source: QuickBooks
How to Delete a Deposit in QuickBooks
Deposits may need to be deleted from time to time: Perhaps it was entered in error or a duplicate of a legitimate deposit was included. To delete a QuickBooks Online deposit, take these steps:
- Navigate to Settings > Banking > Make Deposits
- If the Payments to Deposit box opens, Select “Cancel”
- Hit “Previous” in order to move through existing transactions to find the deposit you wish to delete
- Select Edit > Delete Deposit
How to Use the QuickBooks Mobile App
Most QuickBooks Online tasks are best completed from a desktop app, but plenty of other actions might make the most sense to complete while you’re out and about, from handling invoices to scanning receipts to tracking expenses or mileage.
For these tasks, you can download the “QuickBooks Accounting” app from the App Store, or the “QuickBooks Online Accounting” app from the Google Play Store. Once you’ve logged in, you just need to hit the “+” symbol at the bottom center of the homepage, and you’ll pull up the main menu, which you can scroll through until you find the task you need.
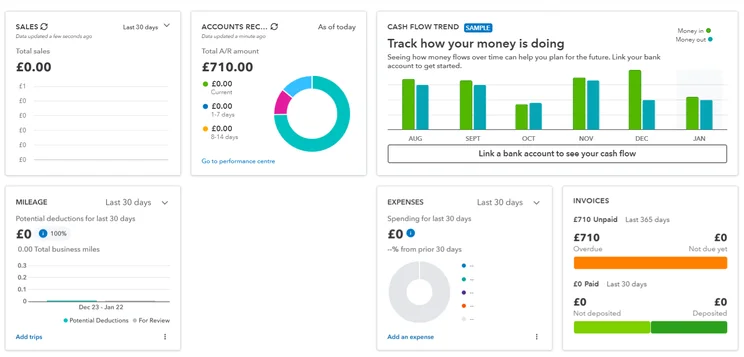
We were able to create in-depth reporting dashboards with QuickBooks, but the learning curve was a bit steep. Source: Tech.co testing
How Easy Is QuickBooks to Use?
QuickBooks is complex software, but we found it offers a handful of helpful functions that make the experience of figuring it out fairly easy. First, it offers automatic tooltips that can guide new users through common processes.
Second, it has an intuitive interface. You’ll be able to rely on a left-hand main menu on the home dashboard that hosts most of the features you’ll need, accompanied by a customizable “favorites” widget for any other tasks you need to access quickly. Overdue payments are easy to spot from the main dashboard, for instance. That said, we did experience some cluttered menus and unclear signposting, so your experience with the interface may vary, depending on your needs.
Finally, we appreciated the tools QuickBooks includes to help users move along to the next step in their accounting procedures, such as a button that helps convert an initial estimate into the invoice that will be sent to the same customer or client.
It’s not perfect, however. Our testers noted difficulties with several processes, including tax preparation and setting up payment reminders. Some tools are inconsistent, as well. Many automated emails are pre-populated, for example, but confirmation emails need to be typed out manually.
Ultimately, the high number of features and the complexity of the tools make for a steep learning curve compared to some alternatives we tested, like FreshBooks. However, you will have many tooltips and online guides to help you get over it.
What Are Some Alternatives to QuickBooks Online?
QuickBooks Online stands as one of the top accounting software our researchers have tested, due to a great feature catalog, reporting tools, a top-quality support team, and a customizable interface.
However, it’s not our top pick overall: We found Zoho Books offered the best accounting solution on the whole, earning 4.8 out of 5 stars to beat QuickBooks (4.6/5 stars). Zoho Books delivers even better features, with better usability. Plus, while both options are inexpensive, Zoho’s $15-per-month starting cost beats QuickBooks’ $38-per-month cost.
Other options are well worth considering, too, since they offer different strengths for different business models. Xero is our top pick for anyone with an online business, for example, thanks to its granular inventory management (QuickBooks lacks this tool across its lowest two plans, Simple Start and Essentials) as well as its expansive ecommerce integrations.
Finally, you may want to consider FreeAgent, which offers a simple interface that’s great for freelancers and includes a few helpful but less common tools, including tax timeline notifications and forecasting features.
For more on these software solutions and others, check out our full guide to QuickBooks alternatives. We’ve built a table for quick reference, as well.
|
Starting price
|
Free trial
|
Best for
|
Pros
|
Cons
|
Try now
|
||
|---|---|---|---|---|---|---|---|
 |
 |
 |
 |
 |
|||
|
FreshBooks |
Xero |
Zoho Books |
FreeAgent |
QuickBooks |
|||
|
|
|
Free |
|
|
|||
|
30 days |
30 days |
14 days |
30 days |
30 days |
|||
|
New businesses |
Experienced accountants and established businesses with complex financial needs |
Integrations |
Budget-conscious businesses |
Businesses needing advanced financial insights and customization |
|||
|
|
|
|
|
|||
|
|
|
|
|
|||
| Try FreshBooks | Try Xero now | Try Zoho Books | Get Quotes | Try QuickBooks |
Read our complete QuickBooks Online pricing guide or check out our Zoho Books vs QuickBooks comparison.
Tips for Using QuickBooks Online
Once you know how to use QuickBooks Online day-to-day, try adding a few more tips and tricks to help you get the most out of the experience.
- Reconcile your checking, savings, and credit card accounts every month: Keeping on top of this process will ensure it stays easy.
- Save early and often: You can save any form by hitting Alt + S (If you have a Mac, use Option + Control + S instead. QuickBooks Online is our top accounting pick for Mac users).
- Use keyboard shortcuts: Saving isn’t the only shortcut available. See a full list of common QuickBooks Online shortcuts over here.
- Set up recurring invoices: Set-it-and-forget-it is the name of the game.
- Attach a receipt to your expense entries: This adds a paper trail that will help you back up your expenses.
- Consider adding spellcheck: You can toggle QuickBooks’ spellcheck by navigating to Edit > Preferences > Speller.
- Change physical payments to electronic payments: If possible, stop cutting physical checks for business expenses, since digital payments can be automated more easily.
Next Steps: Ready to Use Accounting Software?
Any accounting software can be difficult to get started with – all those data-heavy tools can be forbidding to a newbie. QuickBooks has more features than most accounting solutions, but it doesn’t have to be intimidating.
Now that you’re equipped with the step-by-step advice listed above, you’re ready to dive in. Start setting up your optimal workflow today. Once you’re done, you can relax. All that’s left is a regular daily or weekly check-in to maintain everything.
FAQs
QuickBooks offers online tutorial videos as well as a FAQ database that uses a customer forum to get answers to common questions from users of the service.
QuickBooks is considered a relatively easy interface to figure out – although it has complex tools that can be difficult to customize at first. The accounting process will always remain a little confusing to anyone without experience in the paperwork-heavy process.
QuickBooks Online has a few downsides: Accounts payable functionality, inventory management and budget management are only available on higher-priced plans, like Plus and Advanced. However, the service still offers more features than the average accounting solution we’ve tested.
If you click on, sign up to a service through, or make a purchase through the links on our site, or use our quotes tool to receive custom pricing for your business needs, we may earn a referral fee from the supplier(s) of the technology you’re interested in. This helps Tech.co to provide free information and reviews, and carries no additional cost to you. Most importantly, it doesn’t affect our editorial impartiality. Ratings and rankings on Tech.co cannot be bought. Our reviews are based on objective research analysis. Rare exceptions to this will be marked clearly as a ‘sponsored’ table column, or explained by a full advertising disclosure on the page, in place of this one. Click to return to top of page


